Pages

Showing posts with label Kuksa. Show all posts

Friday, 31 January 2014

Gift

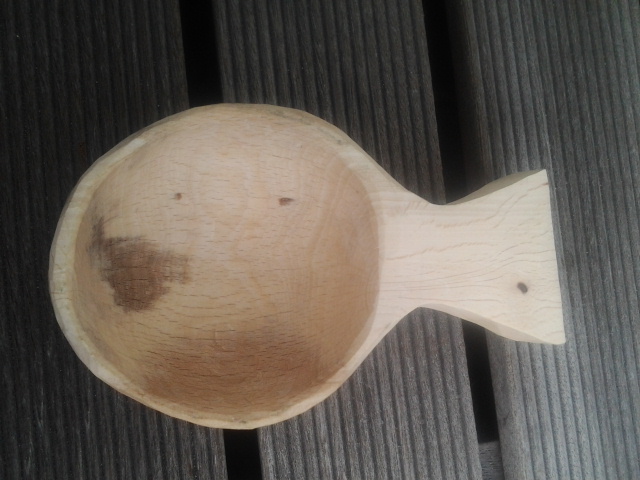
This little kuksa is a gift for a friend. She likes whisky and I think she also appreciates treen. I thought a kuksa and a bottle of something good would make her happy. The wood is nice and dark around the base. I do not know why that is, but I like it.
I tapered the rim for drinking-comfort.


I can never refuse a photo with a knife.

Nice dark colour on the base.

It is yet again in sycamore. I got my hands on two logs quite a while back, and they seem to have no end! I recently found some beech and rhodondendron to carve though, and I`ll start on it even if I still have a lot of sycamore left. I`ll enjoy the change. I have never carved rhodondendron before but I have heard it makes nice spoons. (For those that worry: the toxins in rhodondendron are mainly located in the leaves. The wood is quite safe, especially after sealing with oil).

 Meanwhile, I am awaiting a package from Finland. Not too long ago I ordered some knifeblades from Brisa. I wanted to have a go at making some handles for blades other than Mora, and I hope that I can get some practice with the blades I ordered before I go on and handle the knife I got for christmas. It is something I am excited about.

Saturday, 25 January 2014

Sycamore kuksa

With the lessons from my previous post fresh in my mind I finished another sycamore kuksa today. It has thin walls, and I`ll dry it long and slowly. Yet again, however, I may have not taken enough of the inner growth rings away in order to gain some depth. I guess it is my version of "living on the edge".  I think this one is less good than the one I carved last week, but overall I am pleased.  Kuksas are cool. 


The knot you can see in the handle was a right bugger! Wild grain directions and tough as a nail. Eventually I opted to keep the handle a bit thicker than I had planned to avoid ruining my knife as well as the workpiece itself. 

Today Robin Wood published pictures on his blog of his new batch of spoon knives being produced. I`ve been wanting a lefty to help me hollow these cups out better, and want one of his. Soon! (I hope).

Friday, 24 January 2014

Lessons learned...


In the beginning of December '13 I made this cup, and after I managed to dry it for a week or so I thought: "I guess it will not crack, I can take it into use now", and after sealing it with the milk treatment that is what I did. For a month and a half it seemed to hold up well. Untill I filled it up with coffee this morning, and disaster struck! A large crack opened up, and I cringed at seeing my work become useless within three seconds. 


I guess something like this was needed to teach me a few lessons. 
  1. Kuksas need to be slowly dried before being taken into use. No exceptions.
  2. Thinner walls are better. (This is something I have been working on, for aesthetic reasons, drinking comfort and now also cracking risk.)
  3. Remove a lot of the inner growth rings to relieve the wood of more stress. (In this cup I removed the pith, but that was about it. A decision I made to make a cup with a large volume from the wood I had available.)
While it is no fun to see your own work fail, it is a great way to see what works and what does not. On to progression and better Kuksas now!

Saturday, 18 January 2014

Sycamore kuksa.

Over the last few days I carved this kuksa from  half of a log of sycamore. I love these cups and would like to make them more often. I am currently waiting for the next batch of Robin Wood spoon knives to get a lefty to accompany my mora 164. With a lefty and a righty it will be easier to carve the bowl well. Here are some pictures of the kuksa.


In  the pictures it is accompanied  by a small shrinkpot I made from applewood. I have seen some wonderful shrinkpots by various makers over the last few weeks, so I feel inspired to make more of these as well. My to-do list is ever growing.

Saturday, 7 December 2013

Kuksas

Last week I finished another wooden cup. The design might classify as a noggin more than a kuksa. My largest one yet. It is carved from sycamore and left at a tooled finish. Here are some pictures of the thing:
In progress. Up to this point most was done with the hatchet and the spoon knife.

Nearly done. In the picture are all the tools I used in the making. 

Done!

Swiss army knife for scale.


Hollowing this one out was a pain with just a spoon knife. It cost my a lot of time and both of my hands, but the result pleases me. I haven`t applied any finish to it just yet, but I think I know what I`ll do to seal it. I have experimented with using milk to seal a kuksa. I had a kuksa from hawthorn, but since it is a ring-porous wood the coffee seeped out through the grain. It seemed that all the walnut oil in the world could not seal the grain. I was adviced a myriad of solutions on the spooncarving facebook group where there are many experienced wise and friendly folk gathered. One of the solutions was sealing with boiling milk. The casein in the milk will seal the grain. I don't know exactly how it works but i do have a theory. Casein is a largely hydrophobic protein that is rich in proline-residues. When milk is boiled these proteins denature and can form aggregates that serve as a barrier between the wood and the outside world. I think that some proteins of the casein family can even form micels. This property could allow the formation of bilayer barriers that are rather stable. It does not really matter exactly what happens though. Bottom line is that the casein in the milk seals the grain from the outside world. The excess milk is poured away and wiped off thoroughly, removing the milk as a substrate for bacteria and preventing the kuksa to become bacteria-infested. So I went ahead and boiled said kuksa in milk:


It is important to not immediatly wash the kuksa when it is out of the milk. Wipe it down and rub it with a cloth instead. This leaves a lovey shiney finish and the cup is sealed. I have heard that this finish withstands washing in soapy water once it has had time to set. I gave it a few hours and then tested the cup with hot coffee. I`m happy to report it worked a charm. Next time I`ll finish a cup this way I`ll do it differently though. Then I`ll just pour boiling milk in the cup to the rim and leave that for a few hours. That is an easier approach that must work just as well if not better.

For the rest I am very happy that my copy of the book "Swedish Carving Techniques" arrived last week. It is indeed a wonderful book and I understand what all the fuss is about. A lot of knowledge and inspiration is gathered in these pages.

Saturday, 12 October 2013

Hawthorn kuksa #2.

I enjoy carving kuksa-style cups. They take more effort than spoons, but the outcome is satisfying. This far I have carved four, but the latest one is maybe the first one that approaches the right size.


Compared to the kuksas I did earlier I think I am slowly improving. In the next picture you see my first, third and latest. The second I have given away to a fellow student at school. I hope I`ll find some more wood in the right sizes soon, because this hawthorn is slowly becomming a bit rough on the edges. Also, I do not have much left that is suitable for carving.

Wednesday, 11 September 2013

Hawthorn Kuksa - Finished

Today I decided to go ahead and sand the hawthorn kuksa. Halfway through the job I remembered why I disliked sanding so much. It is a messy buisness. But in this case, the result is worth it. Ladies and gentleman, I present: A sanded, oiled kuksa, ready to be used.


Tomorrow it has been a week since I got my hands on the hawthorn, and I have used one third of it. Carving is really effective at keeping me away from what I should do. Like study. Here is what I have made over last week:

Three spoons, a scoop and a kuksa.

Thanks for reading :-)

Tuesday, 10 September 2013

A scoop and a kuksa in progress

Today I finished off a little scoop. It is in hawthorn, as that is the wood I have currently. The scoop was inspired by the work of a member in a spoon-related facebook group I`m a member of. It is a fantastic group to be in because your always inspired with new ideas, styles and techniques. Like this scoop. I have quite a bit to post today, but I`ll let the pictures do the talking for now.
 It is a small scoop, with a bowl-diameter of 6cm and 10 cm overall length.

I went ahead and sanded it. It is the first spoon I have sanded in months and months. I have been working on my tooled finish, and it is coming along well. In this case I wanted a really smooth surface because I wanted to see how the grain would pop out. There were hints of a psychedelic pattern in the grain, and I wasn`t disappointed.


Here are some more pictures. I am trying to work on the quality of those. There is lots of room for improvement there. I had good intentions to take pictures outside today, but the rain was so enthousiastic that I didn`t really dare venture outside.


Now for part two of my post. A kuksa. Two days ago I began working on a kuksa. The largest one I have started this far. I also did a picture sequence on how it progressed, but considering the lenght of this post I`ll save that for when it is finished. Here is a picture from the kuksa in its current state.

 I am considering sanding it, now that I have seen how the scoop turned out. I haven`t quite decided yet. Currently I am letting it dry slowly in a bag filled with wood shavings, hoping it won`t crack. I have removed a fair bit of the inner growth rings to be on the safe side. I think it`ll be fine.


Friday, 28 June 2013

Aaand its gone...

Today someone on my study expressed interest in my kuksas, and asked if he could have one. I gave him the second one i made. Quite odd to see it go already, but nice to see others appreciating my craft. To celebrate and mourn the thing, two more pictures:


Wednesday, 26 June 2013

Another kuksa

To avoid the stressfull things associated with school at the moment i decided to just ignore more pressing matters and carve. I took the opposing side of beech i carved the previous kuksa from and started chopping again to make another one. I think it turned out quite a bit better than the last one. No cracks this time, and no band-aids needed. I haven't oiled this one yet. I will wait a bit untill it is dryer. I was not as patient with the last one. I gave it some coats of walnut oil to see what it would do with the colours. Quite a promising prospect for the unoiled kuksa, i think!

Monday, 24 June 2013

A small kuksa

Today I decided not to make a spoon, but try something more elaborate than that. I got my tools out, selected a bit of straight grained beech from my meager woodpile (I need to go find new...) and began to chop and chop and slice untill I had something kuksa-looking. It only lacked the hollow. I thought that this would be a tedious task with just my Mora 164 to go at it, but the old faithful piece of steel surprised me once again. Despite the bad reviews it gets I get along with it very well. It left very nice clean cuts and removed wood at a decent pace. Anyhow, here are some pictures:
Chopping out the rough shape.

Beginning to form the bowl-shape

I forgot to take more WIP-pictures, so here is it in its near-finished state. 

Once it was nearly done I noticed a beginning crack in the front of the bowl. I superglued it, and will dry it very slowly to stop it from developing further.