Pages

Friday 31 January 2014

Gift

This little kuksa is a gift for a friend. She likes whisky and I think she also appreciates treen. I thought a kuksa and a bottle of something good would make her happy. The wood is nice and dark around the base. I do not know why that is, but I like it.
I tapered the rim for drinking-comfort.


I can never refuse a photo with a knife.

Nice dark colour on the base.

It is yet again in sycamore. I got my hands on two logs quite a while back, and they seem to have no end! I recently found some beech and rhodondendron to carve though, and I`ll start on it even if I still have a lot of sycamore left. I`ll enjoy the change. I have never carved rhodondendron before but I have heard it makes nice spoons. (For those that worry: the toxins in rhodondendron are mainly located in the leaves. The wood is quite safe, especially after sealing with oil).

 Meanwhile, I am awaiting a package from Finland. Not too long ago I ordered some knifeblades from Brisa. I wanted to have a go at making some handles for blades other than Mora, and I hope that I can get some practice with the blades I ordered before I go on and handle the knife I got for christmas. It is something I am excited about.

Saturday 25 January 2014

Sycamore kuksa

With the lessons from my previous post fresh in my mind I finished another sycamore kuksa today. It has thin walls, and I`ll dry it long and slowly. Yet again, however, I may have not taken enough of the inner growth rings away in order to gain some depth. I guess it is my version of "living on the edge".  I think this one is less good than the one I carved last week, but overall I am pleased.  Kuksas are cool. 


The knot you can see in the handle was a right bugger! Wild grain directions and tough as a nail. Eventually I opted to keep the handle a bit thicker than I had planned to avoid ruining my knife as well as the workpiece itself. 

Today Robin Wood published pictures on his blog of his new batch of spoon knives being produced. I`ve been wanting a lefty to help me hollow these cups out better, and want one of his. Soon! (I hope).

Friday 24 January 2014

Lessons learned...


In the beginning of December '13 I made this cup, and after I managed to dry it for a week or so I thought: "I guess it will not crack, I can take it into use now", and after sealing it with the milk treatment that is what I did. For a month and a half it seemed to hold up well. Untill I filled it up with coffee this morning, and disaster struck! A large crack opened up, and I cringed at seeing my work become useless within three seconds. 


I guess something like this was needed to teach me a few lessons. 
  1. Kuksas need to be slowly dried before being taken into use. No exceptions.
  2. Thinner walls are better. (This is something I have been working on, for aesthetic reasons, drinking comfort and now also cracking risk.)
  3. Remove a lot of the inner growth rings to relieve the wood of more stress. (In this cup I removed the pith, but that was about it. A decision I made to make a cup with a large volume from the wood I had available.)
While it is no fun to see your own work fail, it is a great way to see what works and what does not. On to progression and better Kuksas now!

Saturday 18 January 2014

Sycamore kuksa.

Over the last few days I carved this kuksa from  half of a log of sycamore. I love these cups and would like to make them more often. I am currently waiting for the next batch of Robin Wood spoon knives to get a lefty to accompany my mora 164. With a lefty and a righty it will be easier to carve the bowl well. Here are some pictures of the kuksa.


In  the pictures it is accompanied  by a small shrinkpot I made from applewood. I have seen some wonderful shrinkpots by various makers over the last few weeks, so I feel inspired to make more of these as well. My to-do list is ever growing.

Thursday 16 January 2014

A closer look at sharp.

A sharp knife that leaves a smooth surface after a cut is essential for carving. I have been having a look at some of my edges with 40x magnification to get a better understanding of the meaning of "sharp", and thought I`d share my findings. 

Lets begin with the edge of my Victorinox Huntsman. This knife is in my pocket/backpack everyday and is put to regular use. It passes my paper-test, but it is not shaving sharp at the moment. The paper-test for me is as follows: Does the knife smoothly slices through a standard sheet of A4 paper that is losely held at the corner? If the answer is no, then I consider the knife blunt. I have to say I was surprised to see the state of this edge: 
Victorinox huntsman

Sections of the edge are quite ragged, and there are grooves and nicks in the bevel. Having seen this I have to say that it cuts better than I should have expected by the looks of it, but perhaps it is more like sawing then cutting at some places. Compared to my Opinel #8 it is quite a mess.   
Opinel #8
Here is an image of the edge of my Opinel at 40x magnification. I once reset the secondary bevel of this blade to 17 degrees, and have since then only maintained it with a strop. I am a little more careful with this edge than with the Victorinox one (i.e. I do not scrape with it and do not cut where there is a high risk of hitting metal/stone etc) but I have certainly not shied away from using it. I am very fond of the friendly appearance of the Opinel and therefore I often have it on me. It regularly cuts boxes, fruits and vegs, wood, tape, rope and all other things one cuts on a daily basis. I`ve had it for more than two years now, and am seriously impressed with how it keeps up! Especially for the price. Anyhow, as you can probably guess from the image, this blade is seriously sharp. It shaves with ease and currently puts my SAK to shame.

I am a bit reluctant to show the next one, as it shows what a poor job I have done in sharpening the EKA folder. The Lansky-kit I have has 5 different grids, and to reprofile this blade I started on the coarsest one. Then either in the step from coarsest to the next, or the step after that, I have not been thorough enough in grinding out the grooves of the previous stone. This results in this bevel that is relatively smooth, but ploughed through with deep grooves left by one of the coarser stones. At the edge this produces the effect of tiny saw-teeth. The knife will cut well, and feel sharp, but it will not last long and it most certainly is not a pretty sight to me. Needless to say I want to redo this one soon. 
EKA swede 10

On to two of my carving knives. First I`ll show the edge of one of my Mora 120s, because it has something interesting going on. If you look at the bevel here, you see that toward the edge it gets smoother and the angle of lightreflection changes. This is due to the fact that the bevel is slightly rounded towards the edge. This rounding is caused by my stropping the blade a lot. Initially it is not really a problem, but from time to time a rounded edge has to be set straight again on the stones, as I will do with this one. I will also spend more time on the 800 grid waterstone before moving on to 2000 and 5000. This is to get rid of the same problem I described with the EKA.
Mora 120
 The last one I  have here is the best example of sharp I had to put under the microscope. It is my Mora 711 blade that is my main carver. I use this knife all the time and keep it in good shape. There is some slight evidence of rounding, but this is far from causing a problem on this knife. The bevel is smooth and the only grooves you see are caused by the fines stone I own.
Rehandled Mora 711
 Of course sharpness of a blade is also defined by other factors like Edge Geometry and material, and not only how the bevels look. It is, however, the main factor for the sharpness of all edges. I will now not go into edge geometry, or the fact that for some cutting tasks a coarser edge is actually better. Looking at some edges in such detail increased my understanding of sharpening, and it also showed me that some of my blades need a bit of attention soon! If you want to understand your own knives better, have a look at the edge in detail. Using a microscope to achieve 40x magnification is fun, but with a small lens like this one you can already see all you need to see.
 

Sunday 12 January 2014

Testrunning the Mighty Swede

This weekend I have reground and sharpened the EKA swede 10 I received for christmas. Regrinding was not really necessary, but I am a bit particular about my edges. I suppose other knife enthousiasts can relate to that. I set the secondary edge at 25 degrees. The steel takes a very decent edge, and after testing it today I found it also retains this edge quite well. It is 12C127 stainless steel, which I believe is the alloy that is also used for some of the stainless Mora blades. With a 130 grams and a spine thickness of 2.8 mm this is quite a large and heavy duty lockback folder.

When we went on a walk through a local park I figured I`d take it along to get some pictures and do some tests. Unfortunately it was excellent weather. The park was filled with people, meaning the conditions were not ideal to test a knife without getting weird looks. I did get some things done though.


Harvesting some branches from a dead tree went very smoothly in a few large and powerful cuts. Cleaning up the ends and carving some feathersticks to test the edge and the grind went rather well. Sharpness was not an issue at all, and after today I know that it also retains the edge very well. After cutting up quite some wood, and then being used to cut meat and veggies for dinner the Swede was still shaving sharp without having to strop it. This folder is very solid and is an excellent all purpose knife to have in the pack. Either as a back up knife, or as a primary knife on shorter trips. I do find it too much knife for it to be my every day carry option. In daily life I find that my Victorinox Huntsman or Opinel #8 are more than sufficient. The Mighty Swede will from here on live in my daypack, and come on trips where I by no means need a fixed blade but might run into stuff that is a bit too intimidating for my poor old swiss army knife.

Monday 6 January 2014

Spreaders

Lately I have enjoyed carving spreaders. Compared to spoons they are rather simple, but there is still quite some difference between a good and a bad one. I`ve found that a good spreader must be comfortable in the hand, so the handle must be a bit thicker and more rounded than the blade. Another important feature is that the angle of the blade must be correct when holding the spreader, so that you do not have to twist your hand or arm in uncomfortable angles to make it work. Here are six spreaders. The left bottom cluster is sycamore, the others are made out of birch.
 I really like the difference in the grain between the two wood types. The rippling effect in the sycamore is lovely, but the richer and darker colour of the birch is also really nice.
I like carving spreaders. There is a lot more to them than I initially thought, and I will keep experimenting with curves and ergonomics. If you carve but have never tried to make a few of these I strongly encourage you to do so!

Wednesday 1 January 2014

Happy Holidays

I am having them. My days in Norway have been slow and comfortable this far. There are a couple of things I want to show in this blog, beginning with some amazing christmaspresents I have received from the family of my significant other.
 The folding blade is the EKA swede 10. It is a very heavy duty lockback folder with a hollow ground and secondary edge. It promises to be a very nice alrounder to have kicking around the backpack, and on most daytrips a blade like this will be all one needs and more, so I am very excited about it. It is very well built. There is no "play" in the joint and it comes quite sharp. I will reprofile the secondary edge to 25 degrees to make touch-ups on my lansky system easier.

Another sharp shiny bit I received is this lovely handforged hunting knife. It has been made by a blacksmith in Norway, and was gifted to me by the parents of my girlfriend, together with the leather you see in the background. This leather comes from a deer that my girlfriends father shot last fall, and he tanned it himself. His plan was that I`d make a handle for the blade and then he could show me how he makes knife sheaths, using this leather. The blade is rather heavy. It is 4 mm thick, and tapers towards the tip. It has a small secondary bevel that I shall grind till it is even. It was intended as a hunting knife and the secondary bevel will be perfect for the tasks a knife does in hunting/butching. I think it must be obvious that I am chuffed!


---WARNING - BUTCHING PICTURES!---
What follows is a write up about me learning more about processing birds for eating, and involved pictures of the killing and butching of the pearlhens that were to be our new years eve dinner. While I think that everyone should know where meat comes from, and that 'homegrown' meat is as animal friendly as meat gets, some people might not like to see the pictures.


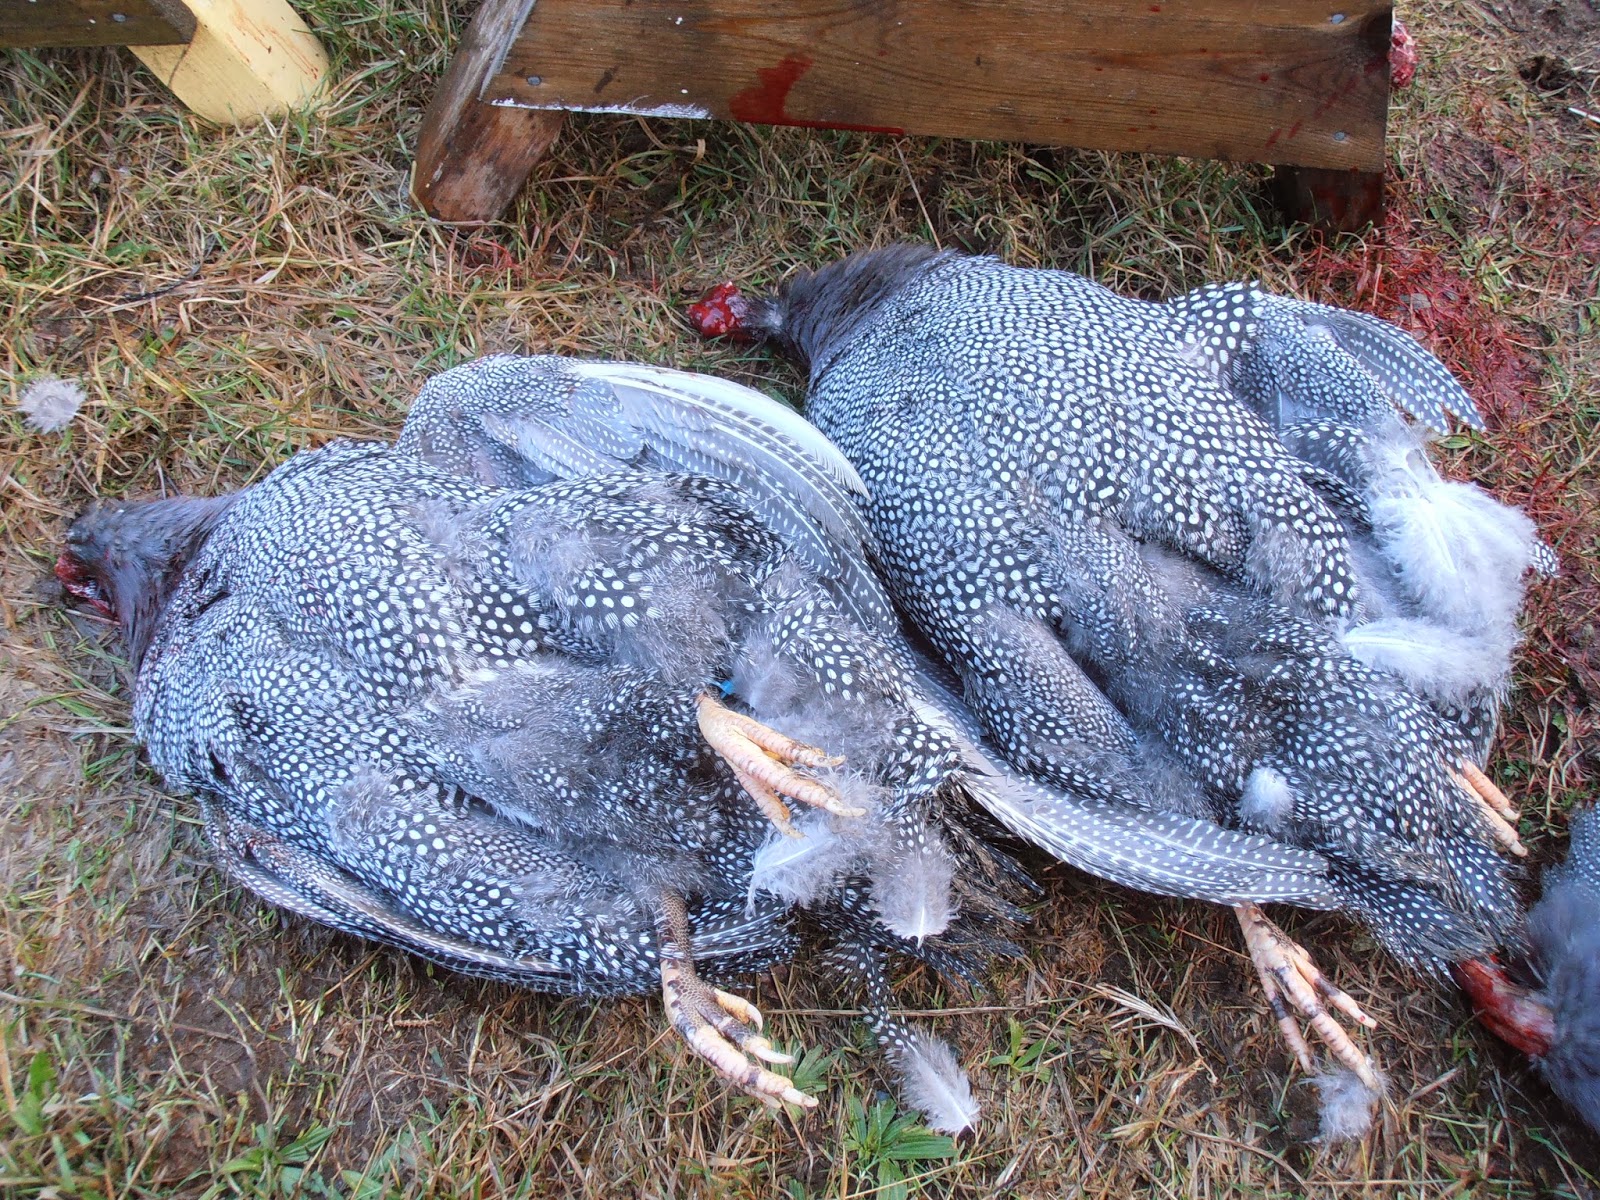
A couple of days ago I have learned a lot about processing poultry from start to finish. We were having pearlhens on New Years Eve, and my father in law (I`ll call him "father in law" for ease of typing) offered to teach me about it. It all begins by killing the bird quickly. In the next picture you can see how the feet and the wing tips are held in one hand while with the other hand one hit with a sharp axe is delivered. This instantly kills the bird. It will take about a minute for it to bleed out, and a minute more before it stops moving, so it is important not to let go yet. Bleeding the bird out yields a nice white meat later on.

 The dead birds are laid aside on their backs. If the feet decide to start running again it will not go anywhere. When the desired amount of birds has been killed (In our case three) it is time to pluck them. First we took the wings off by severing them at the joint.
 And then the (tedious) task of plucking began. In some places it was difficult to get the feathers off without breaking the skin, but eventually we had three plucked pearl hens. We could have also skinned the birds, saving us a lot of work, but keeping the skin on apparently keeps the meat softer when cooked.

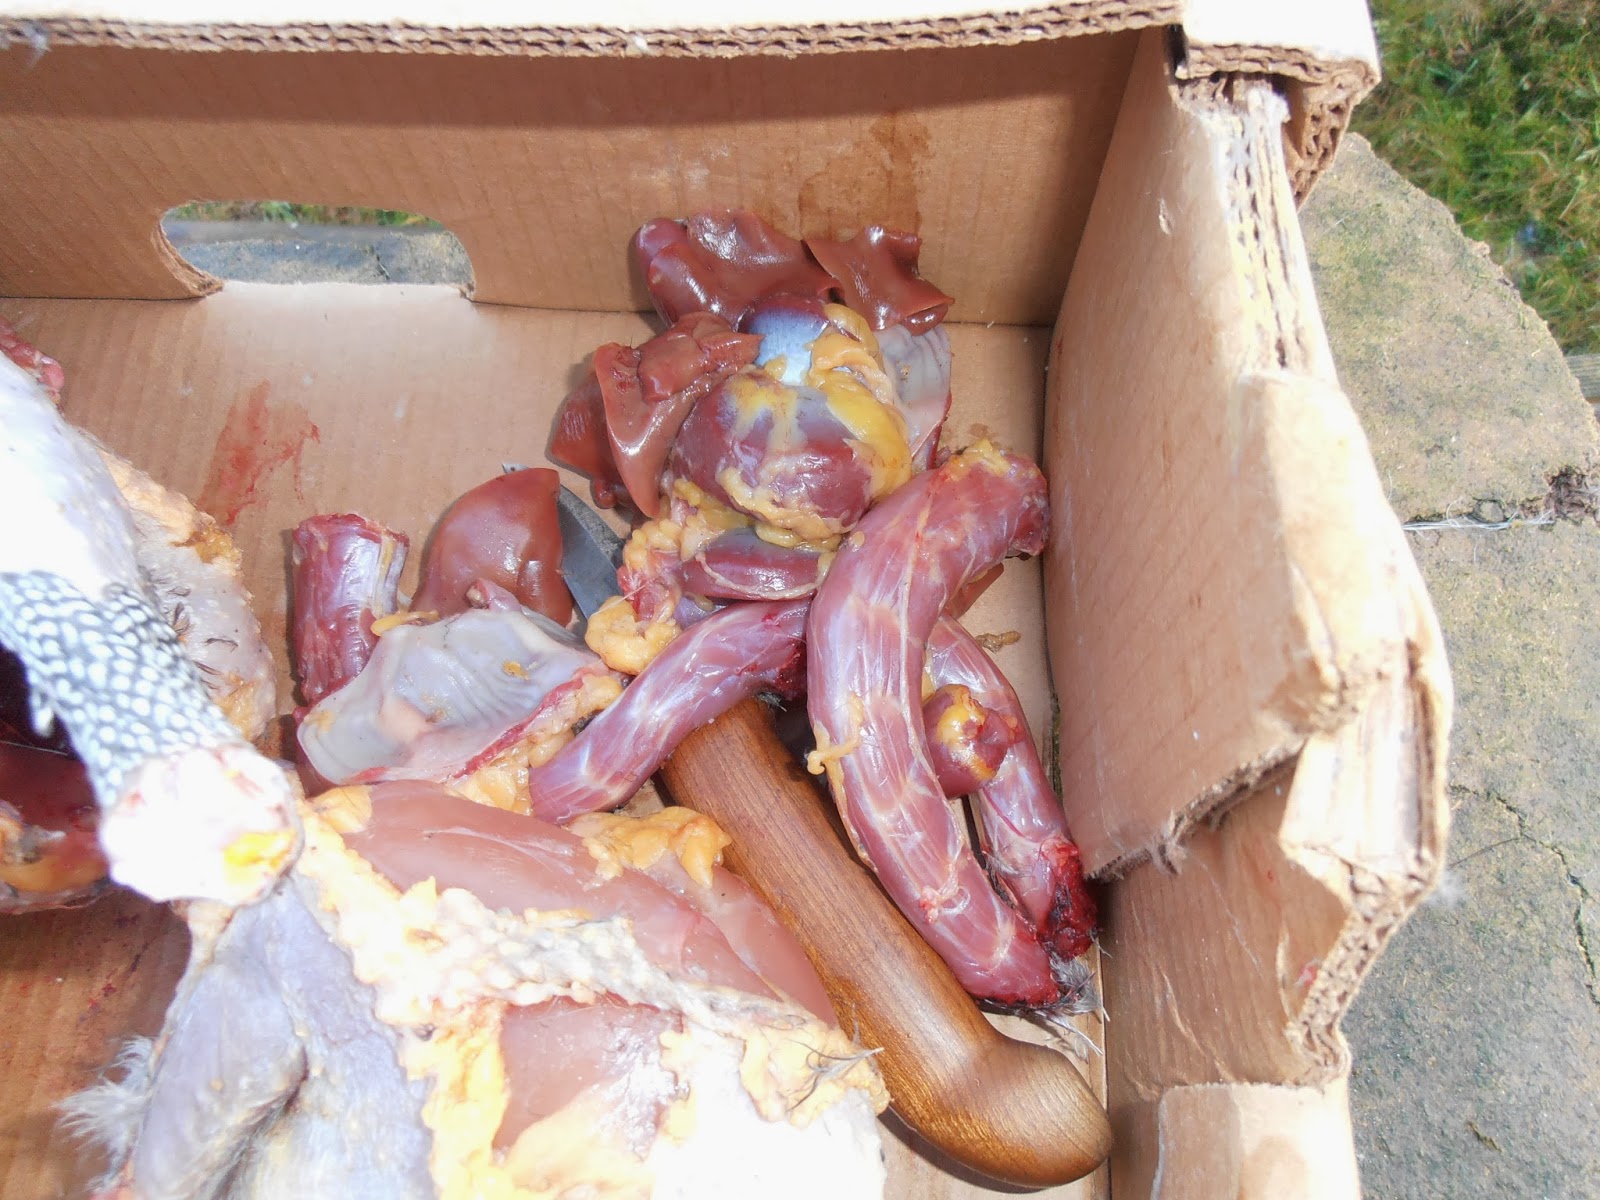
Then time came to take out the bits that are not for eating and separate them from the bits that are for eating. I planned to photodocument this, but my hands were not clean enough for the camera so words will have to suffice. First the feet were cut off. Secondly, there is a sort of bag at the neck of the bird where food passes through. I think this is called the crop. This can be removed with your hands by working it and pulling it, being careful to keep the contents contained. When it is loose you can rip this off the neck together with most that is attached. This leaves the neck clean. Next it is a matter of opening the bird at the back, and using you hand to dig out the intestines and the surprisingly muscular stomach. The stomach is made up of a bag sandwiched by muscles. Carefully cutting between the muscles revealt the bag with the stomach contents. This bag can carefully be removed and the muscles can be saved together with the neck and other edible intenstines. Lastly dig out the heart, liver and kidneys. We left the lungs in.

Here are all the parts that we saved: The necks, livers, stomachs and hearts. These will not be eaten as such but most like used for stocks and/or sauces.

and here are the bits we won`t use: intestines, stomach-contents etc.

I think it is a very nice thing to prepare your own meat in this way. Too many people are not conciously aware of where meat comes from, and what it involves to produce meat. Producing your own like my father in law does is a way of eating meat that feels very honest and fair. A lot fairer than meat produced in the bioindustry. And it is of a really good quality too! Here are the birds all cooked and ready to be eaten, together with a duck the attentive reader may have already spotted in the background of earlier pictures.

Now all that rests me is to wish all that read this a happy new year! The first day of the year has been a fine one for me. I mainly spent it carving and reading by the fire, and now by writing this blog post. I`m looking forward to a year full of carving and other craft projects. I have a list of things I want to do in my head and I wonder if I can achieve some of them. On the list are among other things learning basketry, and brewing beer. For the basketry the main problem is getting my hands on the willow shoots I need. For the beer brewing the main problems is my girlfriend assuring me the smell will be too strong to have it in the house... We`ll see which of these problems will prove easier to overcome!